I saw this tweet from Jenn today:
I replied:
But then! I remembered a trick I learned a couple months ago about inserting a Powerpoint slide into Word.
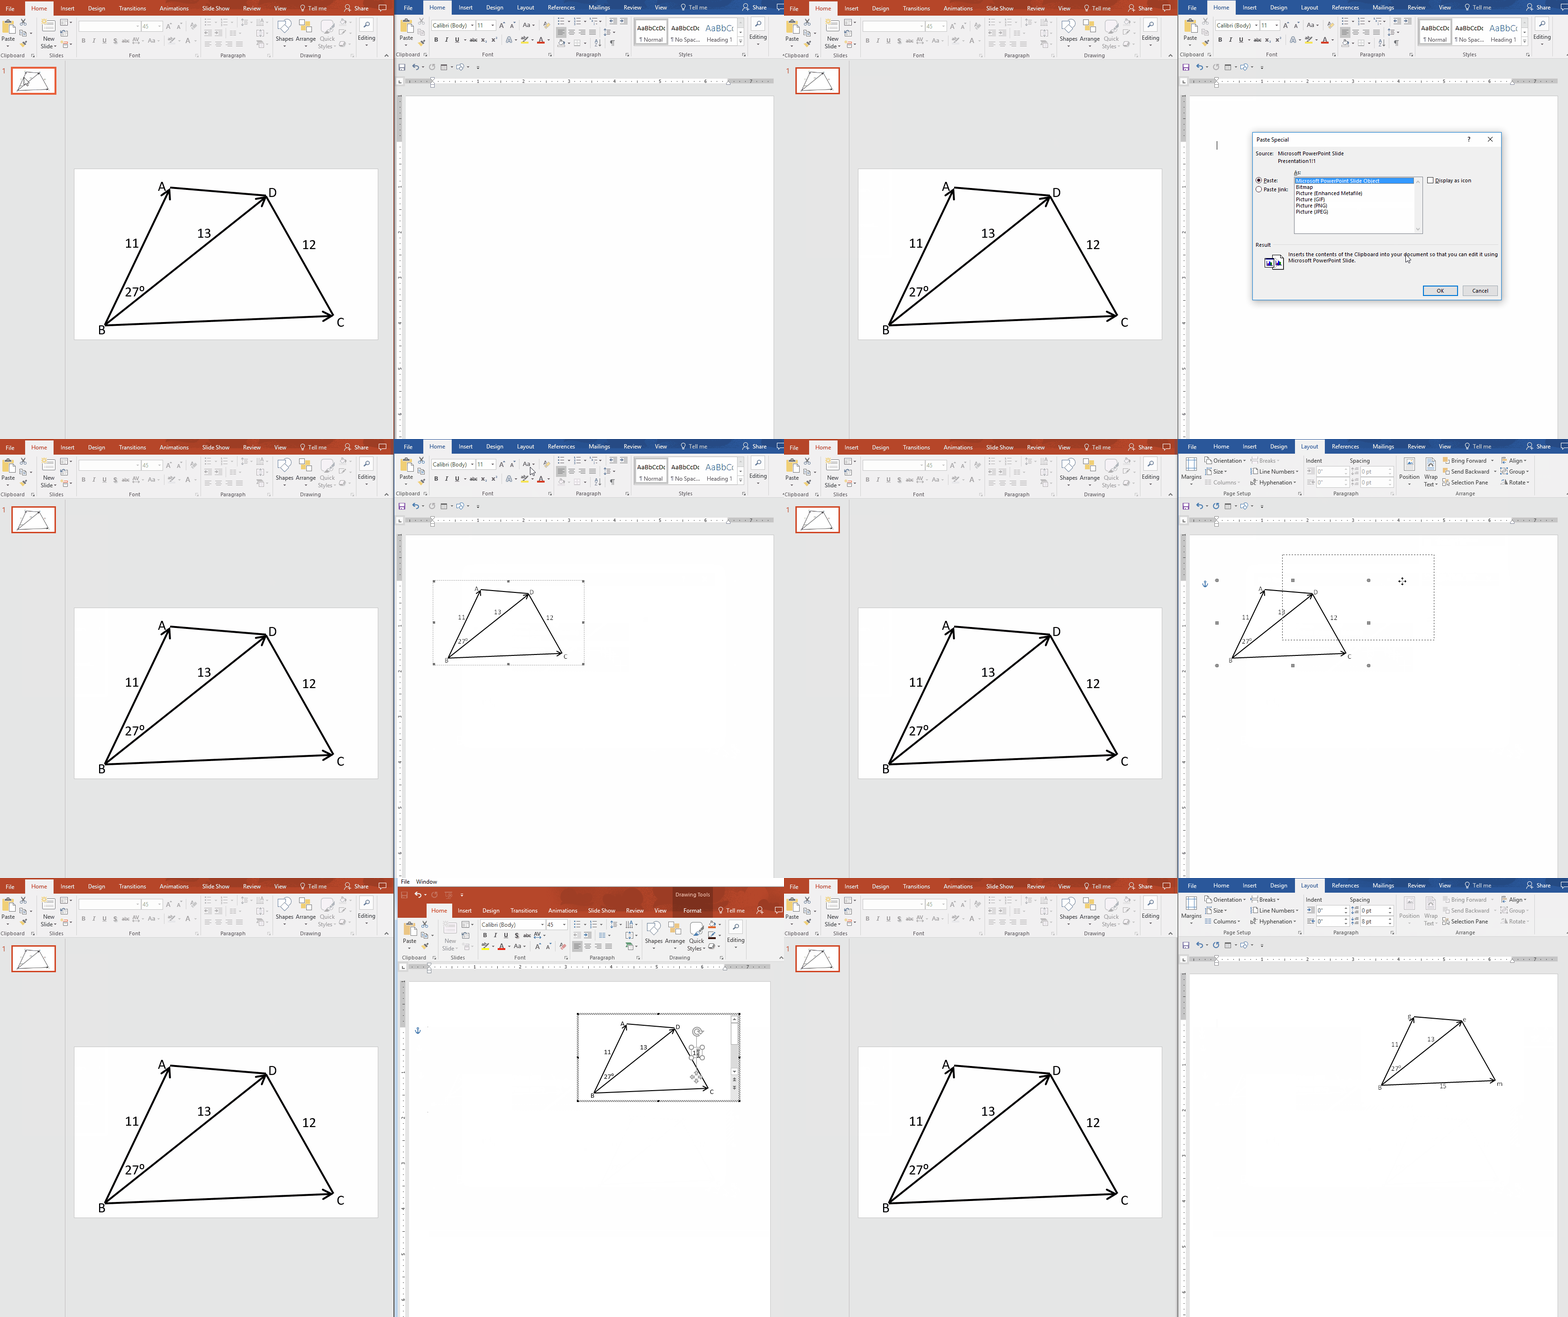
I made the drawing in Powerpoint, using 6 point weight for arrows and 45 point font for labels. (You guys know about clicking on something, holding control, then dragging to copy/paste an object, right? So you only need to set the formatting once, then just copy the arrow or label and move it around to where you need the next one).
At this point you could do a screenshot, which in all likelihood would probably be easiest. BUT maybe you’re like me and make a mistake now and then? Or maybe you go to open the file next year to change something and–darn it–you have to draw the whole thing over again.
Well, with this new trick, if you double click on the image, it brings up the Powerpoint menu within Word. It’s like witchcraft. Watch and enjoy!
The steps to insert the slide are:
Select the slide in Powerpoint, right click, copy.
Go to Paste dropdown menu in Word, select Paste Special, then Microsoft Powerpoint Slide Object.
At this point I like to go to layout, wrap text, choose in front of text. You can also resize.
You can also copy and paste the object and it will act like a separate slide that you can modify independently of the first one:
I just printed them and they look super pretty!
Let me know if you try it out and if you like better than just using a screen shot (or not).
*Side note: Yes, Desmos has geometry now!!! But no labels or ability to change colors (yet), which is why I offered up this option. I used Geogebra quite a bit when I taught Geometry, but I always have to relearn it every year.


Debbie Boden
April 18, 2017 at 11:06 pm
This is awesome!!! I’m staring it with my teachers tomorrow!!!
Thanks Meg!!
Meg Craig
May 8, 2017 at 8:40 pm
You are welcome as always, Deb! Hope they found it useful!!
Allison Krasnow
April 18, 2017 at 11:36 pm
Ok, you’ve got me thinking.
1) Sorry that this is off topic of your real topic, but I have just delved into the word of Gif-making. When you made that Gif, was it a series of screenshots that you put together for the Gif? Or was it a video (using the Gif software) that you made of you doing those steps? Feels like that should be obvious to me, but it’s not.
2) So you find this method more efficient than GeoGebra? I hear you on needing to relearn it each year, but I always revert to it when I need to make diagrams like that one. But now, I’m going to play around in PowerPoint.
HOWEVER
3) Witchcraft is really cool!
Meg Craig
May 8, 2017 at 8:36 pm
1) I use screentogif. It super easy and you can edit the gif, too. 🙂
2) Honestly, since I don’t make any geometric figures anymore, I’m not sure if it would be handier or not. Definitely handy for all the mistakes I made on Geogebra files that I didn’t notice until I shut the window!
3) True that.
Meg Craig
May 8, 2017 at 8:42 pm
1) I use screentogif It’s free and you can edit your gifs, too! (Warning: it’s totally addicting)
2) Honestly, I haven’t tried it in the wild as I don’t have to make many diagrams anymore. But it would be helpful for when you notice your typo in the Geogebra picture right after you closed the Geogebra window (and yes, I was too lazy to save 10 different files for one worksheet.) 🙂
3) True that.
Tom Hall
April 19, 2017 at 10:36 am
I’m gonna remember this tip. It would also be helpful for making a custom guided notepage instead of the generic slide notes you can print from PowerPoint.
Meg Craig
May 8, 2017 at 8:32 pm
Glad it could help you! Did you know you can also export powerpoints as word files? It turns the normal handout page into a word table. It’s under the file menu under “export” then “create handouts.” 🙂